Rain Barrels
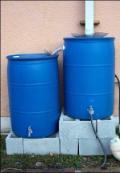
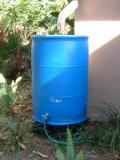 Rain barrels are a great way to reduce stormwater runoff and to save water for a dry spell. If you have gutters on your house, you may be able to collect 55 gallons of water during a 1/2-inch rain by directing a downspout to a rain barrel.
Rain Barrel Workshops
To help you get started, our Florida-Friendly Landscaping™ Program hosts monthly, in-person Rain Barrel Workshops, in partnership with Sarasota County Environmental Services. Search our calendar of classes for a list of upcoming rain barrel classes. Note that online registration is required for the workshops.
With just a few mouse or keyboard clicks, register to participate in a free workshop and/or purchase a rain barrel (or barrels) for the base price of $26.50 plus taxes and fees. Note that barrel purchases must be made through the Eventbrite system by credit card or PayPal payment only, with purchases at pickup locations no longer available. Barrel pickup will follow workshops, at the same location.
Please review and confirm your purchase selection and the associated pickup information on Eventbrite prior to completing your transaction.
If you are unable to visit the specified pickup location, or would like to request an alternate pickup date or location, for purchased barrels, please contact the Sarasota County Environmental Services office via email to reportpollution@scgov.net. Please make sure "Rain Barrel" appears in the subject line of the email, and include your name, purchase confirmation number, original pickup date and location, and other relevant information. Note that timing, barrel quantities and other factors might limit the ability to meet special requests.
Building Rain Barrels
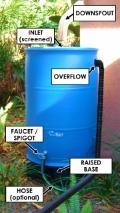
 You can build your own rain barrel, rather than purchasing a pre-made (or ready-to-assemble) version, with some basic supplies and a few simple steps. Click on an item below to expand that section and learn more (show all items).
Tools
- Safety glasses
- Workbench (or other stable work station)
- Electric drill
- Drill bits: 1/8-inch, 3/16-inch, and 1/2-inch to 1-inch
- Jigsaw
- Extension cord (if needed)
- Phillips-head screwdriver
- Pocket knife
- Marking pen
Supplies
- Plastic drum: A 55-gallon drum works best. Barrels that have carried food products (e.g., pickles for a delicatessen) are recommended. Some barrels for cleaning products (e.g., car wash) are OK after thoroughly rinsing. DO NOT use barrels that carried or contacted petroleum or other toxic materials.
- Adapter: 2-inch male
- Adapter: 2-inch male slip x 3/4-inch female threaded
- Adapter: 3/4-inch male threaded x 3/4-inch female threaded elbow (3/4-inch street el)
- Nipple: 4-inch long, 3/4-inch threaded
- Sillcock or hose bibb, 3-4-inch
- PVC cement
- Teflon™ tape or pipe joint compound
- Silicone sealant
- (3) #10 stainless steel sheet metal screws, 3/4-inch
- Strainer: stainless-steel mesh with plastic rim, 4- to 6-inch diameter
Instructions
- Turn the barrel so that the end with no openings is facing up.
- Fit the strainer on the end which is facing up so that it lays flat.
- M
 ark around the perimeter of the strainer, remove strainer and draw another line about ½ inch inside the perimeter line.
 - Drill a pilot hole using the large bit just inside the inner drawn circle.
- Using the saber saw follow the inner circle line until the circle is removed. Remove the circle if it has fallen into the barrel. This is a good time to make sure the barrel is clean inside.
- Drill pilot holes in the strainer flanges and handle using the 3/16-inch bit. Place the strainer on the barrel and mark the hole locations on the barrel.
- Drill pilot holes in the barrel using the 1/8-inch bit.
- Partially screw into the strainer the #10 screws. Check to make sure the strainer holes match the barrel holes.
- Apply silicone sealant to the strainer rim and place the strainer into position. Tighten screws until just snug. (Pat yourself on the back, you have just completed the first part of the barrel).
- Place the barrel on its side. Unscrew one of the plastic filler plugs in the other end of the barrel.
- Apply PVC cement to the two-inch male adapter sleeve and place the two-inch male x 3/4-inch female threaded adapter inside and press together for a few seconds.
- Insert street el into the 3/4-inch hole of the adapter. Use teflon tape or sealant on all threaded parts.
- Insert 4 inch nipple into street el.
- Screw assembly into barrel. Four-inch nipple will work as a wrench to tighten first two fittings.
- Connect water faucet to 4-inch nipple. Hand-tighten to proper position.
- Place barrel on level, sturdy base. Direct downspout over the strainer. (Hooray, you now have a functioning rain barrel).
- Leave 4-inch or larger air gap between down spout and strainer (if screening water). Mount rain barrel as high as practical to use gravity to increase pressure.

Information
Resources
![]()