
WOOD COMPOST BIN
This turning unit is a permanent, sturdy structure. Turning units can compost non-woody yard and kitchen wastes in two months or less. By frequently turning the compost, more oxygen is provided to the microbes decomposing the wastes. Before cutting the removable slats that slide into the grooves at the front of each bin, cut one slat and check for proper fit in each bin. Note that it may be difficult to space the posts to the exact dimensions illustrated.
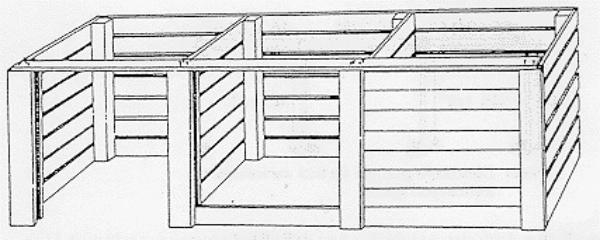
Wooden compost bin, with three turning units
Materials
NOTE: All lumber should be pressure treated.
- Eight 4-inch x 4-inch x 6-foot posts
- Seven 1-inch x 6-inch x 12-foot back slats
- Fourteen 1-inch x 6-inch x 4-foot end/side slats
- Four 1-inch x 6-inch x 4-foot fronts
- Fourteen 1-inch x 6-inch x 46 1/4-inch dividers
- Twenty-four 1-inch x 6-inch x 42 13/16-inch (approximate) front slats (Note: Before cutting all the front slats, cut one and check for proper fit in each bin.)
- Four 1-inch x 1(+)-inch x 4-foot cleats, rip cut from one 4-foot long section of 1-inch x 6-inch (the cleats are retainers for slats)
- 8d galvanized deck nails or deck screws
- One tube exterior construction adhesive
- OPTIONAL: One 1-inch x 6-inch x 12-foot top rail
Tools
- Post hole digger
- Hammer
- Saw
- Tape measure
- Drill
Construction Details
-
On level ground, set the eight posts as shown (posts are darkened squares in the accompanying image) below using a post-hole digger . Embed each post two feet into the ground. Be sure all posts are plumb (perpendicular to the ground). The top of each post should be the same distance above the ground (48 inches).
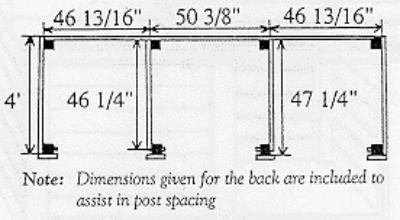
Overhead view/diagram, with dimensions
- Nail (or screw) on the back and side slats and dividers (pre-drill holes to prevent splitting). Use adhesive on all joints. The bottom slats should be at ground level. Leave 1 1/2-inch (horizontal) spaces between slats. Note that the ends of the dividers should come out to 1-inch behind the front of the front posts (as shown in the illustration above).
- Install the fronts and cleats for one of the center divider posts.
- After the front slats have been sized and cut, slide them into place between the fronts and cleats as shown in the completed bin illustration above.
- (Optional) Nail the top rail to each front post. Do not use adhesive, and do not drive nails in fully, as they will be removed to allow access to the slats. The top rail is suggested to prevent the front posts from moving laterally. Another option to discourage lateral movement is to use 4-inch x 4-inch x 7-foot posts and embed them one foot deeper.
Used with permission from "Composting to Reduce the Waste Stream, NRAES-43" by NRAES, The Natural Resource, Agricultural, and Engineering Service, Cooperative Extension, 152 Riley-Robb Hall, Ithaca, NY 14853-5701 (607) 255-7654
Learn More
- Natural Resources